TableCurve 3D Editor
The TableCurve 3D Editor in the Edit menu is a spreadsheet-like procedure for the input or editing of the program's data table. Use this option if you wish the convenience of spreadsheet entry or if you need custom X,Y,Z data table entry features such as automatic X and/or Y entry, application of a calculation to the values as they are entered, or to view a 3D graph of the data as it is being entered.
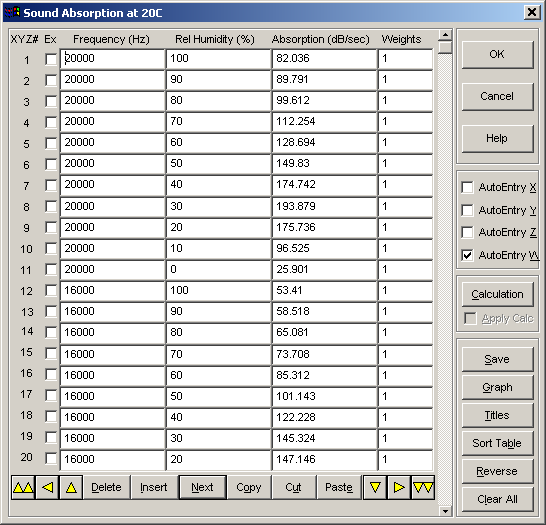
Editing or Input
Simply place the cursor in the numeric field of interest and enter or modify the entry. You may enter any numeric value, expression, or equation up to 80 characters in length. A numeric entry can be concluded by pressing Enter, by clicking in any other field, by clicking on the Next button, or by clicking on any of the arrow button controls.
Moving Between Data Fields
To move about the data table, you may use the arrow button controls in conjunction with the table's scroll bar. You may also use the standard keyboard cursor keys.
Active and Inactive Data Points
An active data point is included in the surface-fitting. An inactive data point is excluded from the fit. The Ex column of the TableCurve 3D editor contains checkboxes for excluding individual points. A point is inactive or excluded when the box is checked. You may also graphically toggle points between active and inactive using On-Graph Editing.
Copy, Cut, Paste
Use these buttons to Copy, Cut, or Paste a single numeric entry. You will use this most often to copy a numeric value that is repeated rather than having to reenter the value. This option cannot be used to paste multiple values into the data table. To append to the data table from the clipboard, use the Import Clipboard option from the program's main File menu.
Inserting and Deleting Rows
A data row can be deleted by pressing the Delete button or by pressing Ctl-Y. You must be certain the cursor is in the row you actually want to delete. To insert a row, place the cursor in the row that will follow the inserted entry. Click on the Insert button or press the Insert key or Ctl-N. You must provide an X, Y and Z value before you can move to any other data row. The program's main data table is automatically sorted primarily by ascending X and secondarily by ascending Y upon exit from the editor, and as such, you may simply wish to input inserted data at the end of the table.
AutoEntry
Use these options if you wish to have the editor automatically input a given value. This is useful for constant increment X and Y values. You may have both the X or Y autoentry on at the same time. This option will determine the value to enter based upon the two previous values. The position in the editor is automatically advanced. The W autoentry for the Weights is not based upon previous values, but rather upon the default value of 1.0 as the weight for each data point. You will wish to leave W autoentry on unless you will be specifically entering weights for the individual data points.
Entering a Calculation
A Calculation can be entered inside the editor. An active calculation is applied to each numeric value at the time it is entered. It is best to restrict X, Y, and Z calculations used in the editor to functions of the respective variable being entered. In other words, an X calculation should only use X and not Y, Z, or W, such as X=X*2.54. A Y calculation should only use Y and not X, Z, or W, such as Y=Y/2*PI. A weight calculation can and probably will use Z, X, or Y, such as W=1/LN(Z).
Applying the Calculation to Existing Data
After entering a calculation in the editor, you are offered an option to Apply the Calculation to all existing entries in the data table.
Toggling a Calculation
If the Apply Calc item is checked, the calculation is applied to all new data as it is entered at the bottom of the data table.
Viewing the Data Being Entered
The Graph button is used to open a separate window which displays the data as it is entered in the editor. The graph is automatically re-scaled as new data are entered or when old data are deleted. Use this option to insure your data are being entered properly.
Saving the Data Table
The Save option saves the data table to an ASCII file. This is the program's default data format. Unlike the save option in the File Menu, this option preserves the actual ordering of the data points.
Clearing the Data Table
The Clear button is used to clear the data table of all entries.
Basic Titles
Use the Titles button to reassign the main, X, Y, and Z titles for the data table.
Sorting the Data Table
You may Sort the data table by either an ascending or descending X, Y, Z, magnitude(X,Y), or magnitude (X,Y,Z). You must save the sorted table inside the editor in order to preserve this ordering. The data table is automatically sorted primarily by ascending X and secondarily by ascending Y in the prescan which occurs when exiting the editor. All data tables saved from the program's main menu will have this ascending X, ascending Y ordering. In order to sort the data table, the current cell must contain a valid entry.
Reversing Variables
You may Reverse any two variables in the data table. There is an option to reverse the X and Z variables, one to reverse the Y and Z variables, and one to reverse the X and Y variables. Note that for all of TableCurve 3D's built-in equations, X and Y are interchangeable. You will most likely wish to use this option to fit Y as f(X,Z) or X as f(Y,Z) rather than resorting to X or Y root-finding with the Z as f(X,Y) equations. In order to reverse variables, the current cell must contain a valid entry.
Adding Revised Data to the Notebook
If you exit the editor with the Cancel button, you are asked if you wish to lose all changes made in the editor. If you answer Yes, all revisions are discarded.
You must save the revised data to a data file upon exiting the editor in order to have this new data source automatically appear as a new object in the notebook.